Mark and Jack have written a very easy to understand instruction manual on how to build, and install your own solar heating panel.
Building an inexpensive solar heating panel
by Mark BowerLong before the start of the cold season, Jack Sage (JES) from Montana and I listened to news reports of how heating costs this coming winter would be sky high. Paying last winter's heat bill was tough enough, so knowing we'd have even higher heat bills this winter was, to say the least, scary. We both agreed to do something about it.
So throughout the summer Jack and I explored various options of creating "cheap heat." The most sensible solution we found was to heat the air in our home using a solar heating panel. Yep, we decided to let the sun help heat our home.
We spent countless hours reading and searching the internet for information on building a solar heating panel. Solar power was big in the 70's and early 80's, so you'd think finding good information would be easy. Well, it wasn't. We found a lot of information, but some of the it contained errors, some information was incomplete, and others required parts which were either hard to find, no longer available or expensive. So we put our heads together, tried this, tried that, and finally came up with a workable solar heating panel that doesn't cost a lot to build.
How it Works
 When you think "solar", you may first think about those expensive
panels designed to create electricity. We are talking about a completely
different solar panel. Our solar heating panel is designed to heat air,
not create electricity. Other designs include heating liquid.
When you think "solar", you may first think about those expensive
panels designed to create electricity. We are talking about a completely
different solar panel. Our solar heating panel is designed to heat air,
not create electricity. Other designs include heating liquid.
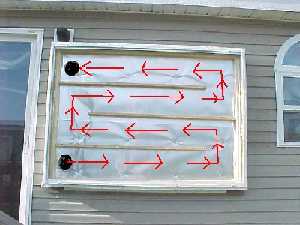
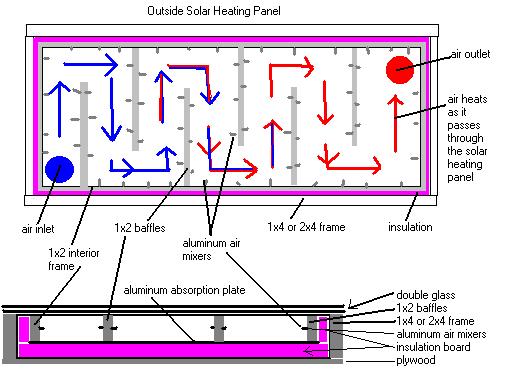
To heat, air is drawn into the bottom of the panel. The air zigzags through the panel and comes out of the top 10-50 degrees warmer on sunny days. Air moves through the panel either by convection or by a fan located at the top. Sounds like a simple concept, but do one thing wrong and you'll get less than desirable results.
Two Types of Solar Heaters
Depending upon what works best in your case, you can build the solar
heating panels in two ways -- to work inside your home or outside your
home. Heaters that work outside your home can be fastened to your roof
or the south side of your home. Heaters that work inside your home will
hang in a south-facing window. Generally, outside heaters will create
hotter temperatures and will be bigger than the inside heaters. Outside
heaters will have double-pained glass and insulated on all sides. Inside
heaters may have single-pained glass and no insulation except for some
in the back. For the purposes of this article, we will show you how to
build the outside solar heating panel.
Start with the Glass
Glass (or Plexiglas) is the most expensive piece to our solar heating
panel. So we look for good discarded windows to help cut costs.
Double-insulated glass is a must for outside solar heaters. For the
solar panel shown in this article, we found an old double-pained window
that measured approximately 4'x5'. If you are building an inside solar
heater, then use Plexiglas so you can build the unit to the size of the
window it'll be hung next too.
Build the Frame
 Using 1x4' or 2x4's, build a frame that will fit the glass you found.
Nail a piece of 1/2" plywood to the back of the frame. Since this solar
heating panel would become a permanent fixture on the side of my house, I
covered the frame with a metal that matched the trim on the house.
Using 1x4' or 2x4's, build a frame that will fit the glass you found.
Nail a piece of 1/2" plywood to the back of the frame. Since this solar
heating panel would become a permanent fixture on the side of my house, I
covered the frame with a metal that matched the trim on the house.Add Insulation and the Absorption Plate
 Line the back of the panel with 1.5" insulation board. The insulation
board comes in 4'x8' sheets and is easily found at most home improvement
stores. Cut to fit using a utility knife. Simply set in place. No glue
or fasteners needed.
Line the back of the panel with 1.5" insulation board. The insulation
board comes in 4'x8' sheets and is easily found at most home improvement
stores. Cut to fit using a utility knife. Simply set in place. No glue
or fasteners needed.
Aluminum flashing is used as the heat absorption plate. Aluminum flashing is inexpensive and readily available. If you don't use aluminum, you want something that will conduct heat well, like copper perhaps.
 The best absorption plates are those with selective surfaces, such as
surfaces plated with nickel, then covered by black chrome. They conduct
heat superbly with hardly no long-wave emissivity (reflection). But they
are also very expensive, so we aren't using them here.
The best absorption plates are those with selective surfaces, such as
surfaces plated with nickel, then covered by black chrome. They conduct
heat superbly with hardly no long-wave emissivity (reflection). But they
are also very expensive, so we aren't using them here.
 The aluminum flashing is available in many width and lengths. For this
project, I used flashing that was 30" wide and 10' long. Cut to fit,
overlapping in the middle is OK. No need to glue or fasten.
The aluminum flashing is available in many width and lengths. For this
project, I used flashing that was 30" wide and 10' long. Cut to fit,
overlapping in the middle is OK. No need to glue or fasten.Screw Window Frame to Panel (optional)
 The window I found came with a removable frame. So at this time I
decided to screw the frame to the panel. If your window must be
permanently screwed to the panel, wait and do that as the very last
step.
The window I found came with a removable frame. So at this time I
decided to screw the frame to the panel. If your window must be
permanently screwed to the panel, wait and do that as the very last
step.
Keeping everything sealed is important for an efficient working panel. Before I screwed the window frame to the panel, my son put down a layer of weather-stripping.
Set the window frame on the weather-stripping and screw into place.
Add the Baffles
 Add strips of insulation board to the sides of the panel. On this panel, I used 3/4" insulation board.
Add the interior frame boards and baffles. Everything is held in place using these boards. When the glass is added, these boards must seal to the top of the glass. That will make them approximately 2" tall. Double check all measurements.
Screw the interior frame boards directly to the side of the panel. Keep everything at the same height.
 If you haven't determined the size of your pathways (area between the
baffle boards), you need to do that now. Read these Rules of Thumb for
help. In our panel, we determined we needed pathways with equal 20
square inches. Our pathways are approximately 10" wide by 2" high.
If you haven't determined the size of your pathways (area between the
baffle boards), you need to do that now. Read these Rules of Thumb for
help. In our panel, we determined we needed pathways with equal 20
square inches. Our pathways are approximately 10" wide by 2" high.
The baffle boards are screwed in place by first drilling several holes down through the baffles. Apply weather-stripping to the bottom of the baffle boards. Then a 4" screw is driven down the baffles, through the 1.5" of insulation board, then into the plywood at the bottom.
Cut Out the Air Openings
 Next step is to cut in the air openings. Normally you would have one
opening in the lower left and the other in the upper right (or vice
versa). But in our case, we had to put the openings on the same side so
they wouldn't interfere with some cabinets on the wall. The opening size
should closely match the pathway size. In our case, we used a 5"
opening as it's area was about 20 square inches. Again, read these Rules
of Thumb for more information. I used a jigsaw to cut my openings.
Next step is to cut in the air openings. Normally you would have one
opening in the lower left and the other in the upper right (or vice
versa). But in our case, we had to put the openings on the same side so
they wouldn't interfere with some cabinets on the wall. The opening size
should closely match the pathway size. In our case, we used a 5"
opening as it's area was about 20 square inches. Again, read these Rules
of Thumb for more information. I used a jigsaw to cut my openings.Hang the Panel
 Whether you hang your panel on the wall or on the roof, you must first
do some preplanning. Figure out where the wall studs or roof rafters
are. Your panel will be fastened to these studs or rafters. Plus, your
panel needs to be lined up so the air intake and outlet doesn't hit a
stud or rafter. In our example, we mounted the panel flat to a south
wall. If you wish that the panel be pointed slightly up towards the sun,
that needs to be taken into consideration now.
Whether you hang your panel on the wall or on the roof, you must first
do some preplanning. Figure out where the wall studs or roof rafters
are. Your panel will be fastened to these studs or rafters. Plus, your
panel needs to be lined up so the air intake and outlet doesn't hit a
stud or rafter. In our example, we mounted the panel flat to a south
wall. If you wish that the panel be pointed slightly up towards the sun,
that needs to be taken into consideration now.
Once we figured out exactly where the panel would be located, we screwed a board to the house which would help hold up and support the panel as we screwed it in place.
 We then screwed the panel to the side of the house using 3.5" screwed
with washers. Of course the screws went into the stud of the wall.
We then screwed the panel to the side of the house using 3.5" screwed
with washers. Of course the screws went into the stud of the wall.Air Delivery System
 With the panel now secured to your wall or roof, next step is to
install the parts needed to deliver air to and from your solar heating
panel.
With the panel now secured to your wall or roof, next step is to
install the parts needed to deliver air to and from your solar heating
panel.
We chose to equip our heating panel with a fan. We used a computer fan and hooked it up to a 20 watt solar panel. Most heating panels will work fine without a fan as the air will move by convection -- meaning cold air will enter the bottom and rise out of the top as it is heated. The air may not move as quick, but it will come out much hotter. If you wish to move even more air, then use a squirrel cage blower instead of a computer fan.
Pictured are most of the parts we used to hook-up our air delivery system. Since we determined that our opening had to be 5", all the parts are made to fit a 5" diameter hole. A couple things not pictured would be a trap door to prevent back-drafts at night and a temperature fan control switch. If you intend to build a solar heating panel, some of the parts are available here.
 Pictured to the right is how the pieces would assemble together inside the wall and panel.
The 4.5" computer fan would need to fit snuggly inside the wall plate (right) by removing the back flange (below). A rotary tool works great for this project. Doublecheck which flange you are cutting so the airflow blows out. No fan is needed for the air inlet (same parts less the fan).

 Cut your 5" hole through the wall using a 5.25" hole saw bit in your
drill. If you don't have such a bit available, use a jig-saw or sawz-all
to make the cut.
Cut your 5" hole through the wall using a 5.25" hole saw bit in your
drill. If you don't have such a bit available, use a jig-saw or sawz-all
to make the cut. Measure the distance from the panel to the wall. Add the ear'd connector to the ductwork and slide through hole.
 Seal around the duct with silicone and bend the ears over to secure in place.
  From the inside, add wall plate for a finished look. Secure plate to wall with screws.
  Insert the fan into the wall plate and mount the whole assembly into
wall and fasten with screws. Next we added an electrical box next to the
fan for an on/off switch. Run the wires from the fan to the electrical
box.
Insert the fan into the wall plate and mount the whole assembly into
wall and fasten with screws. Next we added an electrical box next to the
fan for an on/off switch. Run the wires from the fan to the electrical
box.Add the Baffles
 Mount the 20 watt solar panel so it faces south and receives full sun.
Run the wire through the wall of the house and into the electrical box.
Operating your fan with a solar panel makes your heating panel/collector
more efficient because the fan will slow or stop on cloudy days keeping
cold air from circulating into your home.
Mount the 20 watt solar panel so it faces south and receives full sun.
Run the wire through the wall of the house and into the electrical box.
Operating your fan with a solar panel makes your heating panel/collector
more efficient because the fan will slow or stop on cloudy days keeping
cold air from circulating into your home.
 Finish wiring the switch and screw on the switch plate. Flip the switch and the fan should run if its mostly sunny outside.
Another option would be to replace the switch with a temperature fan controller (below) so it only comes on when the temperature in the panel is 80 degrees or hotter.

 We molded a trap door out of a scrap piece of aluminum. The door is
light and easily swings open when the fan is activated. When the fan
shuts off, the door closes preventing a backdraft which would reverse
the air flow and cool air back into the home.
We molded a trap door out of a scrap piece of aluminum. The door is
light and easily swings open when the fan is activated. When the fan
shuts off, the door closes preventing a backdraft which would reverse
the air flow and cool air back into the home. Once the air delivery parts are installed, you should have a very clean,
professional look on the inside. Add a filter to the bottom air inlet
to stop any dust particles from entering the panel. When you no longer
require solar heat, the air inlet at the bottom should be sealed with a
plug made of foam or insulation.
Once the air delivery parts are installed, you should have a very clean,
professional look on the inside. Add a filter to the bottom air inlet
to stop any dust particles from entering the panel. When you no longer
require solar heat, the air inlet at the bottom should be sealed with a
plug made of foam or insulation.Black Paint and Air Mixers
 With the air delivery system installed, next is to finish the panel
and screw on the glass. First paint the insides black. Use a special
high-heat flat black. Black absorbs heat and does not reflect it back.
With the air delivery system installed, next is to finish the panel
and screw on the glass. First paint the insides black. Use a special
high-heat flat black. Black absorbs heat and does not reflect it back.
Once the paint dried, we made air mixers out of scrap pieces of aluminum. As the air flows through the panel, the ridges in the aluminum cause some turbulence for mixing. We stapled the aluminum air mixers to the sides of the baffles and the interior frame.

Glass
 Apply weatherstripping to the top of the baffles and interior frame
pieces (see above photos). Use a weatherstripping that can resist UV
rays. Screw glass to the panel. In the case of our example, the glass
simply set into the frame we earlier added. The glass should set tightly
to the weatherstripping on the baffles and interior frame pieces so no
air can pass over the top of the baffles. Carefully screw glass in
place.
Apply weatherstripping to the top of the baffles and interior frame
pieces (see above photos). Use a weatherstripping that can resist UV
rays. Screw glass to the panel. In the case of our example, the glass
simply set into the frame we earlier added. The glass should set tightly
to the weatherstripping on the baffles and interior frame pieces so no
air can pass over the top of the baffles. Carefully screw glass in
place.
Obviously, this solar heating panel is designed to stay fastened to the home. During the months that heat isn't needed, cover the glass and plug the air inlet and outlet.
Other Designs
 A search of the internet will reveal other solar heating panel designs. Shown at the right is another popular design.
The biggest difference between their design and ours is the location of the black absorption plate. Their design uses a black corrugated aluminum absorption plate (difficult to find) and places it over the top of the baffles. The air moves through the baffles underneath the absorption plate. In our tests we found that when the absorption plate is placed over the baffles, it requires much more heat for the panel to work as all the heat has to be drawn from the absorption plate. In our design we retrieve heat both from the absorption plate and the heated air in front of the absorption plate.
One advantage to their design is that the air would not contact the glass and would rarely require cleaning.
As you can see this type of solar energy can be added to an existing home to help reduce the cost of heating. I am not sure I believe that the little boy in the first photographs really assembled the panel himself but it does show that anyone with a few tools could assemble this panel at home and install it with a minimum of problems.
This article by Mark Bower was very informative and educational.
No comments:
Post a Comment
Please leave a comment.